LastSHOP: Temporary Closures
How to Set Up a Temporary Closure for Your Online Store and Reservation Manager
Follow the steps below to configure a temporary closure of your LastSHOP virtual store and reservation system.
Step 1: Access the Temporary Closures Section
Step 2: Select the Brands to Be Closed
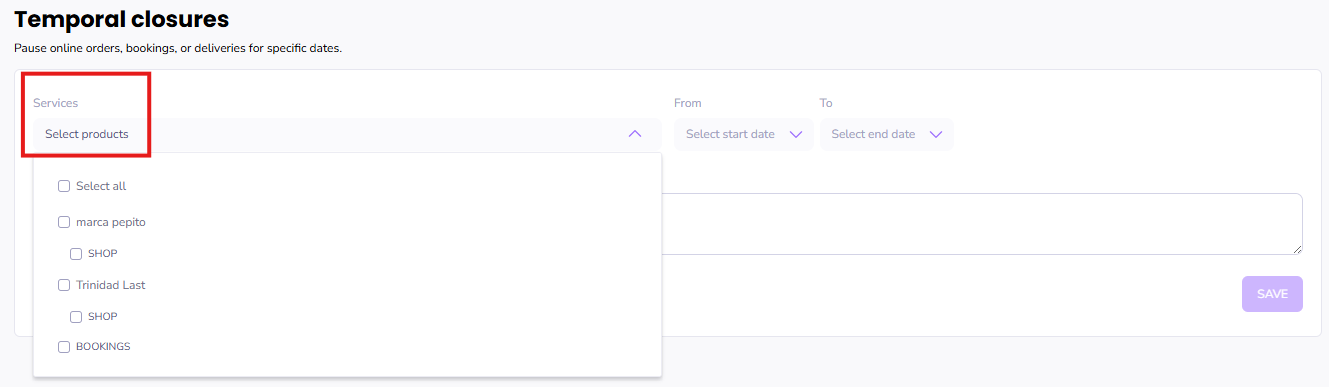
Select the “products” you want to close.
In this context, “products” refer to:
In this context, “products” refer to:
- The virtual brands that have LastSHOP activated
- The reservation manager, if enabled
If you manage more than one virtual brand, make sure to select all the ones you want to include in the closure.
Step 3: Set the Closure Period
Define the start and end date and time for the closure.
Don’t forget to click “Apply” after selecting each date.
You can also add an internal note with the reason for the closure. This will only be visible from the Admin Panel and is for internal tracking purposes.
Step 4: Save
Once all dates are set, click Save.
The selected products will stop receiving orders during the defined period.
Related Articles
LastSHOP: Marketplace
Marketplace: Unite Your Brands in a Single Online Store The LastSHOP Marketplace allows you to group multiple virtual brands under a single online store. Your customers will be able to place one order, with a single payment and delivery, even when ...LastSHOP: Configuration
In this article, you’ll learn how to properly configure your LastSHOP virtual store from the admin panel. Keep in mind that this configuration is location-specific, so if you manage multiple venues, you’ll need to set up each one separately to ensure ...LastSHOP: Configure Delivery Zones
Full Control Over Delivery Zones in LastSHOP LastSHOP gives you full flexibility to manage deliveries efficiently. You can define delivery zones precisely using polygons on the map, allowing you to tailor the service to your operational needs. Below, ...LastSHOP: Customizing Your Store
LastSHOP is designed to offer a fast, intuitive, and conversion-optimized shopping experience. But we understand that every brand is unique. That’s why you can visually personalize your store to reflect your brand identity and connect more ...LastSHOP: Catalog Management, Payment Methods & Other Settings
From the Last.app admin panel, you can fully customize your online store experience. This includes assigning catalogs, configuring payment methods, enabling or disabling services like delivery or pickup, and other key settings to adapt your store to ...
Popular Articles
Getting Started: Muting LastPOS
When a new order is received in LastPOS, the primary device (the "Master") emits a sound to notify staff. If you'd like to mute the system, you can easily do so by following these steps: How to Mute LastPOS Open the side menu by tapping the ...Integrations: FreshKDS
How to integrate FreshKDS with Last.app The integration between Last.app and FreshKDS allows you to automatically send kitchen items from your POS to KDS (Kitchen Display System) devices, optimizing kitchen operations and improving communication ...Getting Started: Enable or Disable Products and Modifiers from the POS
Enable or Disable Products and Modifiers from the POS In Last.app, you can easily enable or disable a product or modifier directly from the POS. The change will automatically apply across your POS system, delivery platforms, and online store — all at ...Getting Started: The Structure of LastPOS
The Structure of LastPOS LastPOS is the platform that enables end-to-end management of any food service establishment. It is built around two main components: POS (Point of Sale): The core system for managing in-house and takeaway operations. ...Getting Started: Table Functions
How to Manage Your Tables From the table layout view, you have several options to manage your tables. In this article, we’ll walk you through the table management menu and the view options menu. Table Management When you select a table, you can ...