Printers: How to Set Up and Configure Them
How to configure printers
Printers must be configured from the Admin Panel, in the Printers section.
Create a new printer
To create a new printer, follow these steps:
- In the Printers section, click the "+" icon.
- Enter a name for the printer. This name will appear on all tickets printed by it.
- Select the printer type. This depends on the printer's protocol.If you're unsure about the protocol, check the printer's manual.At the end of this article, you’ll find a brief description of each protocol.
- If required, enter the IP address of the printer.
- Enable “Split products when printing” only if you want each product in an order to be printed on separate tickets.
- Click Save to finish creating the printer.
Printer settings
Once the printer is created, you can configure the following options:
Default printing
To print orders and invoices, you must set default printers:
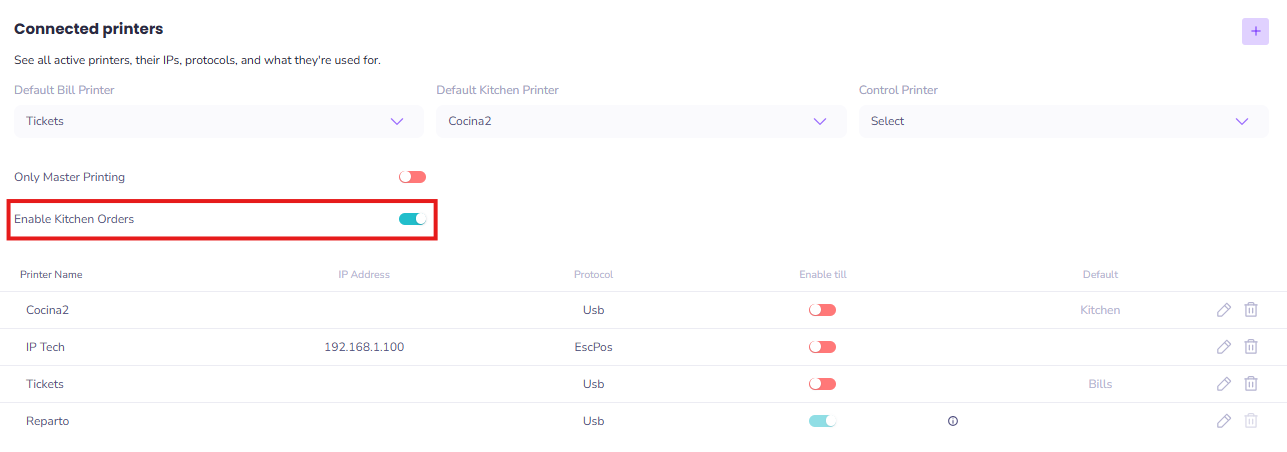
- Default ticket printer: Used to print final customer invoices.
- Default kitchen printer: Used to print kitchen order tickets.
 These are basic default settings. If a product, category, or register is linked to a specific printer, those advanced settings will override the default behavior.
Enable cash drawer
Activate this option if the printer is connected to an analog cash drawer.
- The drawer will open automatically when a payment is registered.
- At least one printer must have a cash drawer active to open/close the shift and generate the Z report.
- If multiple drawers are active, invoices will print to the one currently selected, and reports will be separated by drawer.
Only Master Printing
Enable this option if:
- You use a USB printer connected to a PC but want to send orders from tablets or mobile devices.
- Your location is large and uses different Wi-Fi networks between printers and other devices.
In both cases, the master device will receive the order and send it to the printer.
Enable Kitchen Orders
Enabled by default.
If you disable this, the “Send to kitchen” button will disappear and no kitchen tickets will be printed.
If you disable this, the “Send to kitchen” button will disappear and no kitchen tickets will be printed.
Bill copies
Set how many invoice copies you want to print. The default is 1.
Autoprint Delivery
If you use integrations like LastShop, Glovo, Uber Eats, or Just Eat, enable this option to auto-print tickets when an order is received.
If disabled, your staff will need to manually press the Send to kitchen and Print buttons.
Printing protocols
Choose the correct protocol based on your printer:
- EscPos: Most common. Requires network (IP) connection.
- StarGraphic: Used by some Star printers. Requires IP.
- StarPRNT: Another Star protocol. Requires IP.
- ZPL: For label printers. Requires IP.
- USB: For printers directly connected to a Windows computer.
- EscPosMatrix: For dot matrix (non-thermal) printers.
Star protocols work only via Ethernet.Related Articles
Devices: Route Products to Specific Printers
Why separate product printing by area? In many restaurants, printing is organized by workstation zones to improve workflow, for example, dishes go to the kitchen and drinks to the bar. Last.app allows you to easily configure this setup. How to assign ...Structure of the Administration Panel: LastADMIN
Structure of the Administration Panel: LastADMIN The administration panel is made up of two main sections: Management & Reports section Configuration section Additionally, there is another layer of differentiation within the admin panel that depends ...Delivery: General
How to configure the delivery section? In LastAdmin | Delivery you can configure various options related to your restaurant’s delivery service, including: Advance printing of orders Assigning a delivery Till Assigning a delivery printer Managing ...Schedules: Configuration
In this article, you'll learn how to set your restaurant’s opening and closing hours from the Last.app Admin Panel. This configuration directly affects: Your online store (LastShop) Integrated delivery platforms (Uber Eats and Just Eat) All opening ...Integrations: FreshKDS
How to integrate FreshKDS with Last.app The integration between Last.app and FreshKDS allows you to automatically send kitchen items from your POS to KDS (Kitchen Display System) devices, optimizing kitchen operations and improving communication ...
Popular Articles
Getting Started: Muting LastPOS
When a new order is received in LastPOS, the primary device (the "Master") emits a sound to notify staff. If you'd like to mute the system, you can easily do so by following these steps: How to Mute LastPOS Open the side menu by tapping the ...Integrations: FreshKDS
How to integrate FreshKDS with Last.app The integration between Last.app and FreshKDS allows you to automatically send kitchen items from your POS to KDS (Kitchen Display System) devices, optimizing kitchen operations and improving communication ...Getting Started: Enable or Disable Products and Modifiers from the POS
Enable or Disable Products and Modifiers from the POS In Last.app, you can easily enable or disable a product or modifier directly from the POS. The change will automatically apply across your POS system, delivery platforms, and online store — all at ...Getting Started: The Structure of LastPOS
The Structure of LastPOS LastPOS is the platform that enables end-to-end management of any food service establishment. It is built around two main components: POS (Point of Sale): The core system for managing in-house and takeaway operations. ...Getting Started: Table Functions
How to Manage Your Tables From the table layout view, you have several options to manage your tables. In this article, we’ll walk you through the table management menu and the view options menu. Table Management When you select a table, you can ...